
This post contains affiliate links. As an Amazon Associate I earn from qualifying purchases. View our Privacy Policy.
These Nutter Butter Mummy Pops are so easy and delicious, you’ll be searching for an excuse to make them outside of Halloween! Plus, their deceptive charm and cuteness will have everyone thinking you are an expert (don’t tell them even a total amateur can pull them off)!
")
Why You Will Love This Recipe
Perfect for Halloween! Nutter Butters are covered in melted chocolate and then decorated to look like mummies. So cute!
Makes enough for a party! This recipe makes 32 pops, so it is great to make for a classroom or a Halloween party.
Mummy Pops Ingredients
To make these Halloween Nutter Butter pops, you will need the following ingredients (see the recipe card below for exact amounts):
- Nutter Butter Cookies
- White candy melts: You can use white chocolate chips instead but don’t add the shortening and be sure to stop heating the chips when still lumpy and stir it until smooth.
- Shortening: You can substitute butter or oil for shortening.
- Plain M&Ms
- Mini semi-sweet chocolate chips

Special Tools Needed to Make this Recipe
- Jumbo colored popsicle sticks: You can use plain, jumbo popsicle sticks instead, if necessary. The colored ones are a fun addition but the recipe will work without them.
- Waxed paper or silicone liner
- Baking sheet, optional: If you don’t use a baking sheet, you can just put the wax paper or silicone mat down on a counter or table.
- Microwave-safe dish
- Toothpicks
- Pastry bag or sandwich bag, with a straight, flat tip, optional

How to Make Nutter Butters Mummy Cookies on a Stick
- Lay a piece of waxed paper or silicone liner on the countertop or on the back of a baking sheet (if it is on a baking sheet it is easier to move later if necessary).
- Put the candy melts and shortening together in a dry, microwave-safe dish and microwave at half power for 20 seconds at a time, stirring after each time increment. When only a few lumps remain, remove from the microwave and stir until smooth.
- Take each Nutter Butter cookie apart, so that each cookie is in 2 halves. Dip 1 inch of the popsicle stick into the white candy melts and place between the two cookie halves. Press the cookie halves firmly together. This acts as a “glue” to keep the popsicle inside of each cookie. Let sit for 2-3 minutes to set.
- If the candy melts in the bowl have firmed up, remelt at half power for 20 seconds and stir. Dip each cookie into the candy melts, holding by the popsicle stick, until they are fully coated.
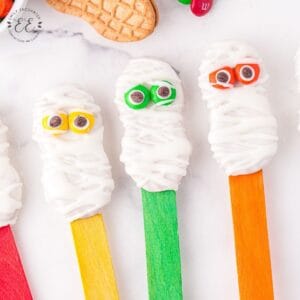
- Quickly place 2 M&M’s to the topside of each cookie before the candy melts have hardened. To finish each eye, use a toothpick and the melted candy melts to “glue” a mini chocolate chip to the front of each M&M, making sure that some of the white chocolate is showing. It is easiest to take a small “dollop” of white on the toothpick and place it on the mini chocolate chip, leaving the chocolate chip on top, in the middle. When you place the chocolate chip on the m&m, you want a little white showing around the edges of the chocolate chip to act as a part of the eye.
- For the mummy “bandages:” Drizzle white chocolate over each cookie with a spoon. Extend each mummy “bandage” past the side of each cookie so that it will look more realistic. Let your mummies dry completely before serving.

Recipe Tips
When applying the mummy “bandages” you can use a spoon, a pastry bag with a straight, flat tip, or with a sandwich bag filled with melted chocolate that has a small end cut off for drizzling.
Storage Instructions
Store your Mummy Pops in an airtight container in a cool, dry place for up to 5 days. You can also freeze them for up to 6 weeks.

Recipe Variations
There are several little things you can do to personalize your mummy pops, for example:
- You can absolutely make these with other cookies! The easiest option is to make these with some type of sandwich cookie, such as Oreos, Tuxedos, or generic sandwich cookies. However, you could also make them with any of your favorite cookies. If your favorite cookies are not a sandwich type cookie, you will just want to use the white candy melts to stick two cookies together on either side of the popsicle stick. I do recommend using cookies with at least 1 flat side so that you can get a good “glue” around the popsicle stick between the two cookies.
- You can easily change these up by using a different colored candy melts. If you want to be really creative you could use a colored melt (like red) underneath white colored “wraps” to get a more contrasting finish.
- You can use candy eyes instead of M&Ms and mini chocolate chips. It isn’t as fun and colorful but it is a little bit quicker.
Mummy Pops (with Nutter Butters)
Equipment
Ingredients
- 32 Nutter Butter Cookies (16 ounce package)
- 8 ounces white candy melts (about 1 ½ cups)
- 1 ½ Tablespoons shortening
- ½ cup plain M&M’s 2 per cookie
- ¼ cup mini semi-sweet chocolate chips 2 per cookie
Instructions
- Lay a piece of waxed paper or silicone liner on the countertop or on the back of a baking sheet (if it is on a baking sheet it is easier to move later if necessary).
- Put the candy melts and shortening together in a dry, microwave-safe dish and microwave at half power for 20 seconds at a time, stirring after each time increment.
- When only a few lumps remain, remove from the microwave and stir until smooth.
- Take each Nutter Butter cookie apart, so that each cookie is in 2 halves.
- Dip 1 inch of the popsicle stick into the white candy melts and place between the two cookie halves. Press the cookie halves firmly together. This acts as a “glue” to keep the popsicle inside of each cookie. Let sit for 2-3 minutes to set.
- If the candy melts in the bowl have firmed up, remelt at half power for 20 seconds and stir.
- Dip each cookie into the candy melts, holding by the popsicle stick, until they are fully coated.
- Quickly place 2 M&M’s to the topside of each cookie before the candy melts have hardened.
- To finish each eye, use a toothpick and the melted candy melts to “glue” a mini chocolate chip to the front of each M&M, making sure that some of the white chocolate is showing. It is easiest to take a small “dollop” of white on the toothpick and place it on the mini chocolate chip, leaving the chocolate chip on top, in the middle. When you place the chocolate chip on the m&m, you want a little white showing around the edges of the chocolate chip to act as a part of the eye.
- For the mummy “bandages:” Drizzle white chocolate over each cookie with a spoon. Extend each mummy “bandage” past the side of each cookie so that it will look more realistic. Let your mummies dry completely before serving.
Nutrition
The nutrition information is calculated using online nutrition calculators and may not be accurate. It is provided as a general guide only.
The recipe and photos contained herein are the property of Emily Enchanted© and may not be copied.
Emily Enchanted
Thursday 4th of August 2022
I love this recipe because these cookies are so cute and the kids love to help.