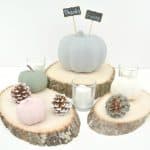
Chalk Paint Pumpkin Centerpiece
Here is an easy craft for a Fall or Thanksgiving centerpiece that will impress everyone who sees it! This DIY Chalkboard Pumpkin Centerpiece is simple and elegant.
Yield: 1 centerpiece
Cost: $15
Equipment
- Paintbrushes
- Paper plates, optional to avoid mess when painting
Materials
- Foam Pumpkin - Medium to Large
- Various small pumpkins and pine cones
- Chalkboard paint in your choice of colors we used grey
- Chalk Paint in your choice of colors we used yellow, green and ivory
- Mini chalkboard signs
- Chalk or chalk pen
- Candles and wood slices optional for decor
Instructions
- Begin by painting the larger foam pumpkin with a coat of chalkboard paint in your choice of colors. We chose a grey color from Martha Stewart crafts. You can place a paper plate under the pumpkin to eliminate mess on your counters when painting.
- While the larger pumpkin dries, use a paintbrush to paint three smaller sized pumpkins or gourds in your choice of chalk paint. You can also use acrylic paints, but chalk paint dries fast and makes for a quicker craft.
- Go back to your larger and smaller pumpkins once dry and paint them with another coat of paint to get rid of any streaks or areas where the original pumpkin color is showing through.
- While waiting for the pumpkins to dry after the final coat, use a small paintbrush to dab just the tips of the pine cones with different colors of chalk paint.
- Once everything has dried well, write “Thanks” and “Giving” on two different mini chalkboard signs. Stick both signs into the top of your foam chalkboard painted pumpkin.
- Use wood slices and real or battery operated candles to help round out your chic chalk painted pumpkin centerpiece. Invite friends and family to take turns writing what they are thankful for on the chalkboard paint pumpkin with either chalk or a chalk pen. Chalk pens work better, but either will work.